by:
Jim "Old Man" Taylor
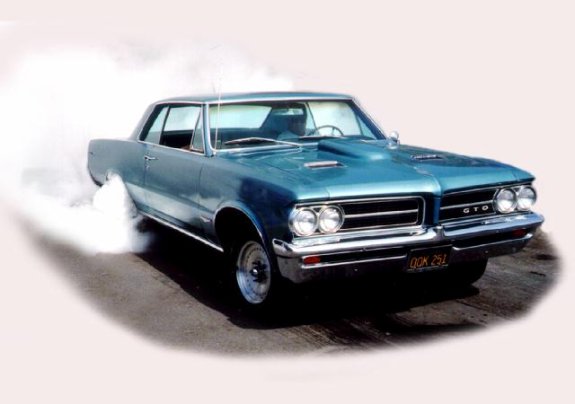
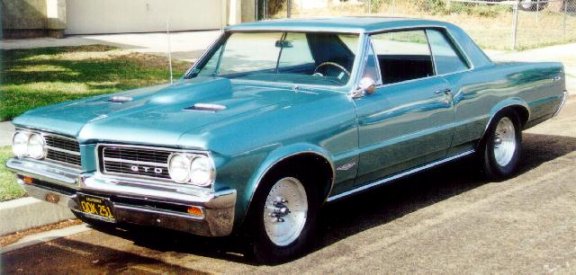
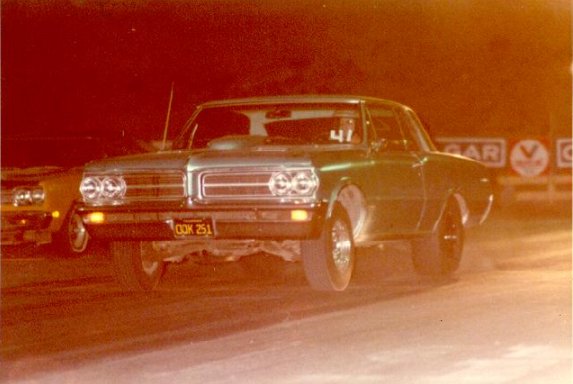
I am the original owner of a 1964 GTO. Needless to say it has been my favorite car. For the first 8 years it was my primary family car, so I couldn’t make many modifications to it. In spite of that I did take it racing now and then. Like all good muscle car owners, I wanted to make it a little faster. I did my first rebuild in 1968 with disappointing results. By that I mean I slowed it down from its stock performance level. That was pretty disappointing. In 1972 I purchased a 69 Catalina wagon, which became my primary family car. This allowed me to take a few more liberties with the GTO, so I rebuilt it again. This also yielded disappointing results. I had succeeded in slowing the car down in the quarter mile from 13.70’s when it was pretty stock to 14.30’s with my modifications. About this time I came to meet an extremely knowledgeable Pontiac aficionado who must have taken pity on me. He helped me a lot, and we became very good friends. One thing he discovered after my second rebuild was that the cam Pontiac had sold me as a 744 was actually a 537441 ("E") which is smaller than an 066. Either someone had swapped it, or the "E" stamping on the snout was misread as an "H". With his help, and getting the correct cam, I finally got that combination to run 13.25. Almost immediately after that the engine self-destructed. The harmonic damper had moved resulting in an out of balance engine. This ended up breaking the crankshaft into two pieces, and cracking the block. At this point I built a 400 out of a 68 Firebird. Its first time out it ran 13.05, eventually getting it to 12.20. The last engine in it was a 428 that went 10.80 and 129.31. By the way, I also built a 428 for the wagon with a 65 tri-power set up. The story goes on, but the point of the introduction is that I do have some experience building Pontiac engines. The purpose of this story is to tell you my experiences with my last rebuild.
If you are familiar with Pontiac engines, you know that the rear main seals are a big problem. Earlier engines I built did not leak, but the second 428 rebuild I did leaked a lot. I had the engine out three or four times attempting to repair it. First I thought it was the pan gasket. Engine out - engine in - not the pan gasket. The second time I removed the engine I changed to a neoprene seal that I had used before with success. Engine out, engine in (EOEI), still bad. The third time I used another rope seal. EOEI, looked good for a few miles, then it leaked again. By this time I was pretty fed up with it. I drove it a lot, keeping the underneath of the car well lubricated. It was so bad that I got a ticket in the mail for being a gross polluter. The oil was thrown primarily onto the right header and exhaust pipe. It then burned off, leaving a smoke trail. In the mean time I had installed a mini starter to make it easier to install the headers. Upon first installation of the new starter I had some shimming problems. This ate some of the flywheel teeth. Fast forward to February of 2000. I am leaving the donut shop with my granddaughter when I hit the starter and it no longer turns the flywheel. Well, being an “Old Man”, working under the car to take out the transmission and flywheel is no fun. So I decided it was finally time to fix the engine oil leak. However, I had been building a 64 Tempest racecar for several years so I could have fun without breaking my favorite car. I could not deal with two cars apart at the same time, so the GTO sat for about a year. In a way that was good news.
The PlanBy the time I was ready to disassemble the engine, a company named BOP Engineering had designed and marketed a new rear main seal to fix this very problem. At last maybe my luck was changing, so I proceeded with the repair. I did not want to pull the crank out, so I loosened the main caps, raised the crank and pulled out the old seal. I would say that more than a half inch of the old seal did not exist anymore. It was no wonder the leak was so bad. Not to worry, new BOP seal to the rescue. This new seal for the large journal crank had just become available, so there was some question about the installation instructions. The seal groove in a 400 is wider than the one in a 428, and so is the seal. In a 400 the seal is wide enough to cover the anti-rotation holes in the block, so silicon seal in the block portion is not mandatory. I had not heard any feedback yet on the 428 seal, so I planned to install it without the silicon seal in the block that way the crank did not have to come completely out of the engine. Confident that I had a solution, I repainted the engine to match the car, then I assembled the clutch, the new flywheel and the transmission to the engine. It was now ready to install in the car. While the completed assembly was on the engine hoist, I decided I would tip the back of the assembly towards the ground just to assure there was no oil leaking. OOPS! It leaked one to two spoonfuls in 15 minutes. Apparently it was getting by the anti rotation holes. Now I am faced with disassembling my beautifully painted engine.
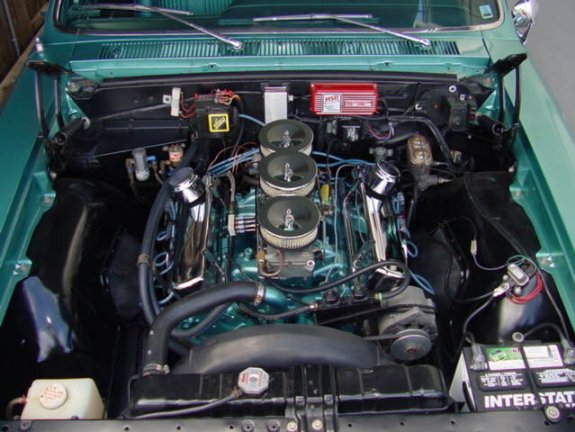
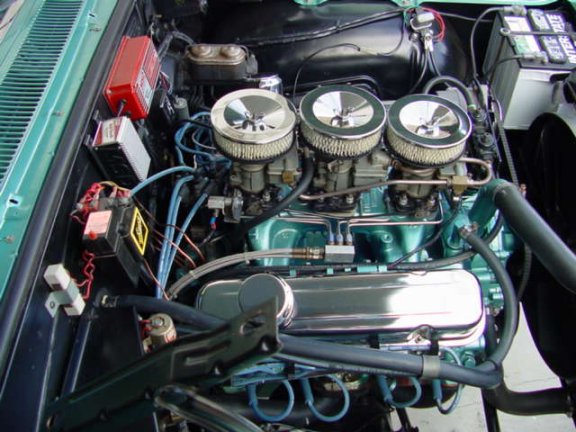
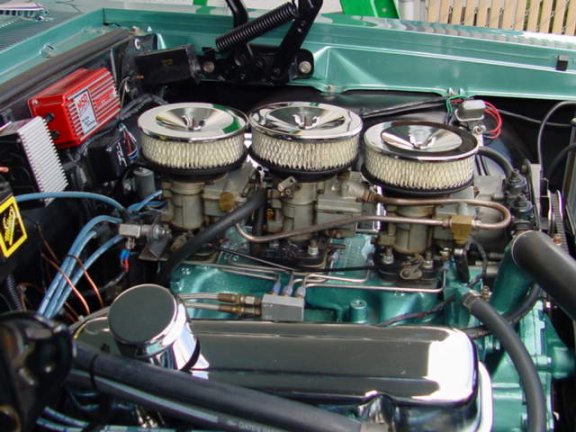
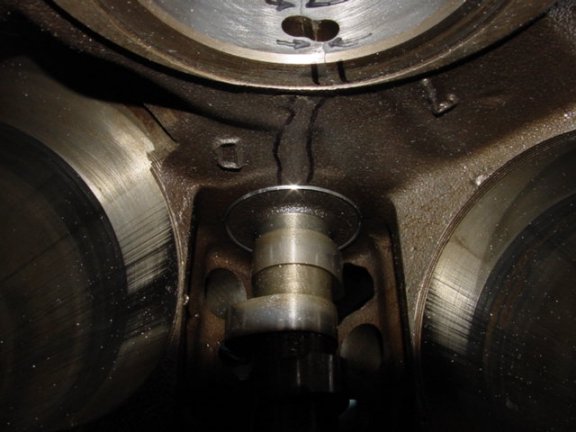
The Modified Approach and New ProblemsThis turned into another good news/bad news story. Since I had to take the crank out to properly install the block half of the seal, I went ahead and took the bearings out and examined the main saddles. I noticed a small crack on the number four main journal. Oh well, it didn’t look too bad, so I thought I would go ahead and use it. However, once I shined a bright light on the area it turned out it was cracked at the main journal oil hole all the way through and up both sides of the web to the cam journal. It was clear the block was history. I can’t really complain as it had lasted for 19 years. It was nitrous assisted, developing about 635 horsepower. It had been to the track several times, running 10.80 at 129.31 on 9" slicks. Well, I knew this would happen some day, so I had purchased spare hard parts many years ago so that I could duplicate the block, crank and heads. By now I am at about June of 2001.
The engine I had just taken apart had more than 0.003" clearance on all bearings due to a previous machinist who "knew what I wanted". Although the bearings out of the old engine looked great, the large clearances resulted in very low idle oil pressure, even when running 20/50 weight oil. So I figured I might as well use the spare crank as well, since the old one was already -0.020". I am sure you can figure out what I found with the replacement crank. Yep, it was not machined for a pilot bearing. Oh well, I would just have it machined and neutral balanced like the old one. The parts had been at the machinist about 4-6 weeks when he called to tell me about another problem. There was a slight crack in the #5 main cap and he would prefer to replace it. No problem, I just sent him the one off of the cracked block. Also, since I had decided to run a slightly larger cam, I had him fly cut the valve reliefs in the pistons an additional 0.070". It wasn’t too long afterwards that I got another call from the machinist. He found that two of the original pistons were collapsed. These were 428 + 0.030" Sealed Power pistons, which were not available. I checked with my good Pontiac buddy, and low and behold he had a complete set that he had purchased years ago for a project that never materialized. GREAT! Now I am back in business. Three months after the parts went to the machinist I got everything back. On to the assembly!
Installing the Crank and SealI cleaned everything thoroughly, painted the valley area with gray Rustoleum and started working on the installation of the crank and the new BOP rear main seal. With the exception of some required filing to get the fit just right, this went pretty well. I got the crank all buttoned up, then had second thoughts about whether I had added a dab of silicon seal to the ends of the seal. The rear main cap came back off for inspection. Yep, I had sealed it, but now I had to do it again. The cap gets put back on, but what else did I forget? Oh yeah, I am not sure I oiled the block half of the seal. I don’t like the idea of it potentially being dry, so I spoke with BOP Engineering. They said that as long as it is liberally oiled on the bottom half (in the main cap, which is facing up to install the crank), the oil should wick into the block portion. So, I take off the rear main cap again and liberally oil the parts of the seal I can get to, and the crank journal. The next logical thing to do is to install and degree the cam. I got the cam in with no problems, but I could not get the new chain and gears on. The crank sprocket wouldn’t go over the crank key. This was resolved with some judicious filing on both the crank key and the keyway in the crank gear. Time to degree the cam!
Degreeing the CamI have the tools to degree the cam, and I have done it many times. One of the tools is the cam follower hardware that has two different followers: one for a flat tappet cam, and one for a roller cam. I know the difference, and I set the proper one aside. Now I did a trial fit of the follower in the tool to remember how it was held in. I did not want any loose parts falling onto the cam lobes. I set up all the equipment and made my first measurements. I couldn’t make any sense out of my results. Every way I measured it the results came out about 20 degrees smaller than I expected. I called the cam manufacturer to discuss it with them. One of his first questions was how I measured it. After I described how I made my measurements, he indicated those would be the expected results if I used the roller follower on the flat tappet cam. I went back and checked it and sure enough what I had done was a trial fit of a follower to remember how it sat in the tool. The problem was that I set the correct follower aside. Once I had assured the assembly of the tool I forgot that it was just a check and I left that cam follower in the tool. I then used the wrong one for my measurements. It had not looked wrong to me as the last time I used the tool was when I had set up the roller cam in my recently completed 64 Tempest racecar. As a side note, this is one of the reasons a roller cam lobe looks so radical. The roller cam lobe has to be about 20 degrees bigger to make up for the duration that is lost using the round contact on the lobe. Well, at least the cam was right. On to the rest of the short block!
Finish the Engine AssemblyI filed the rings to the proper gap, and then installed the piston/rod assemblies. Installation of the pistons and rods went pretty well. At least I didn’t screw up everything. Now I am ready to prepare the heads. They were nicely wrapped in something like saran wrap to keep them clean. I did not open them until I was ready to use them, so I unwrapped them and went to put one on the block. OOPS, no dowel pins in the block. The block had been decked and the shop had not installed any new dowel pins. I checked my parts supply, and it just so happened that I had 4 new dowel pins. So I started putting them in the block. It seemed like I had to pound pretty hard to get them into the block far enough. Now I try to install a head, and it hangs up on the dowel pins. It turns out they were oversized dowels. Now I have to grind out the holes in the heads so they will go onto the block. So I tape up the intake and exhaust sides of the heads to keep them clean and proceed to grind on the holes. After I finish a judicious amount of grinding with the Dremel tool, I install the heads. Ah, great progress is being made now. I install the lifters, pushrods and rockers and proceed to adjust the valves. The lifters are limited travel hydraulics, so the adjustment has to be pretty precise. All of the adjustment goes fine with one exception. It doesn’t seem like I can compress one of the lifters. It turned out that it was just the opposite. The lifter was compressed and would not extend. So I get another new lifter to replace this one. Now I take the engine off of the stand and assemble the flywheel, clutch and transmission to it. Oh, I did remember to fill the pan with oil at this point. Then I remembered that I had a mini starter rebuilt, and it was going onto a different block, so I needed to verify what shims were required for the starter to function properly. That shouldn’t be a big thing, but it turned out that my scattershield covered the area so well that I could not measure anything. So I had to take the transmission and bell housing back off. I trial mounted the mini starter to get it shimmed right, but the diagram was a little confusing. There were two measurements to make. The first is the normal gear engagement measurement, and the second was the depth of engagement. A mini starter throws the gear out whereas the factory starter pulls it in. The dimension given for the second measurement was from the end of the snout on the gear to the flywheel teeth. They provided a shim of about 0.070” to move the gear a little further away from the flywheel in case it was too close. I installed this shim and was ready to proceed.
Installing the Engine in the CarAh ha, I am getting close now. I get the driveline put back together and get everything back into the car, install the headers, starter, exhaust and drive shaft. The bottom end is about done, but I cannot find the u-bolts to hold the u-joint onto yoke in the rear end. Don’t lose these little suckers, as they are not a replacement item and salvage yards don’t keep them. Fortunately my good Pontiac buddy had an extra pair, so I was back in business. Incidentally these had to be for a Chevy as I use a Chevelle 12-bolt rear end. If anyone else has this problem I found that Moroso P/N 85800 fits this application. Now to concentrate on the top end. I will skip the details, but assembling some of it can be a bit tough to complete by yourself, especially if you are an "Old Man". Well, I started pulling the tape off of the intake surface of the intake manifold from the back. To my surprise there were no soft plugs in the back holes, and the holes looked pretty corroded. Oh well, no big thing. I will just get some soft plugs and install them. It turns out that 1 3/16" soft plugs are not that easy to find. Eventually I find them and get them installed, but the one on the passenger side went in much too easily. Now I am ready to resume with the installation of the manifold. I pull the rest of the tape off of the heads and notice that there are soft plugs on the front. That would not do, as the water could not return to the manifold that way. It turned out that during my grinding process I had not kept track of the orientation of the heads, and I had installed them on the wrong sides. At this point it is much easier to make it work than to remove and swap the heads. So I get out a slide hammer and proceed to remove the plugs. I did not want to take the time to rebuild the carburetors so I just replaced the accelerator pumps, the needles and seats, and I cleaned the hardware in solvent. At the bottom of my dirty solvent bucket were the two missing u-bolts. Now I finish the top of the engine and make sure I am ready to start it up. This is the end of my weekend, so I call the mini starter people to find out the issue with the starter, just to be sure. It turns out that their drawing was wrong and the dimension should have been from the teeth of the starter gear and not the snout of the starter gear. However, they thought that would still be OK.
Complete Engine AssemblyBefore I try to start the engine for the first time I remember that I have a stud girdle for factory heads that I have never used. Since the effective duration of the cam is 259/264 at 0.050 with lift of 0.610/0.590, I decide maybe this is a good time to go ahead and use the stud girdle. So I get it out and install it. However, the valve covers have internal oil baffles and they hit the stud girdle. OK, just yank out the baffles. I install it again and now the oil breather is bottoming on the stud girdle. That’s OK, just move the stud girdle down some. It looked like there was plenty of clearance to the tips of the roller rocker arms on the pushrod side. I get this all finished and get ready to install the new distributor gear on the shaft. I don’t want to use the old gear on a new cam as the gear showed quite a bit of wear. I had an unused one sitting around that I had purchased from Warrior years ago. When I took it out for installation I noticed that it was only drilled for the roll pin on one side, and the hole in the gear was much smaller than the hole in the distributor shaft. So I purchased a new Mallory gear so I could get a new gear on right away, then I would have the other one drilled. I opened the Mallory package and it is also only drilled through one side, and it also has a short roll pin for a small diameter hole. I have two concerns about this implementation: Why is the hole not all the way through the gear; and why is the hole so much smaller than the shaft? If the gear is used as shipped you will only have an attachment on one side, and the gear will move back and forth on the shaft as the hole in the shaft is so much bigger than the hole in the gear. Also, how would you ever get the pin out once you put it in? I spoke with the Mallory Tech specialist and I got answers I was not happy with. First, they assumed you would look at the gear and realize you have to drill a hole through the other side. Remember, the roll pin that is supplied with the gear is a small short one, which appears to be designed for use with the gear in its as delivered configuration. Secondly I asked about the different sized holes. The answer was that the holes in the distributor shafts might not all be in the same place, this way the pin will fit through no matter what. However, my concern is that if the gear is used “as is” it can rotate back and forth on the shaft until the small diameter pin catches the big distributor hole in each direction. My guess is that the provider of the gear couldn’t assure an accurate hole in their gear, and that they didn’t want to pay for the tooling for a hole that went all the way through both sides. However, I wasn’t expecting to purchase an erector set, I was expecting to purchase a part that I could install and use. So I sent the two gears and a spare distributor shaft off to a machine shop to get the gears drilled all the way through and drilled to the correct size. In order to continue I go ahead and use my old gear to get the engine running. So I install and set up the distributor, fill the radiator with water and get prepared to start it.
Finally, the Break InI do my last checking before hitting the key. I turn on the electric fuel pump at the back of the car to get gas into the three carburetors. Hopefully it will fire up right away so I don’t hurt the cam lobes. I engage the starter and it makes terrible noises. I take the starter out and remove the shim that I had placed in the starter to move the gear further back. Now it fires up. It started up quickly and ran good at 2500 RPM. However, the lifters were terribly loud. I shut it down and rechecked the adjustment and for some reason two or three of them were loose. I readjust them and fire it again. It is better, but there is still some loud valve clatter. I shut it down, take it apart and I find contact points on the bottom of the stud girdles where the pushrod side of the roller rockers were hitting the stud girdle. For now I just removed them. I will deal with them later. A few days later I go to start it again. I turn on the electric pump, and nothing. Oh well, I will just start it normally and hope it fires right up. It starts up pretty quickly and runs for about a minute when my neighbor said, "shut it down!" I had a water leak. We looked at it closely and there was a slit in the lower heater hose. This is the hose that goes from the heater core to the intake manifold. Apparently the parts house had cut off a piece of hose too vigorously and they cut into the section that I used. OK, no big thing. I just replace that section of hose. I get it re-started and all seems well. I break the cam in for 20 minutes keeping the engine between 2000 and 2500 RPM. It never got over 190 the whole time. Great, I think I am ready to time it and drive it. I have my wife come out and keep the engine at 4000 RPM so I can set the total timing and out of the corner of my eye I see water coming from somewhere. I finish setting the timing and see a gusher at the same bottom heater core hose that I had replaced. Apparently I had not remembered to do the final tightening of the hose clamp. Well, after proper tightening of that hose everything should be OK. I finally get to take it around the block. I keep it close to home in case there are any difficulties, but all seemed well. Then I noticed a mist on the windshield that I thought was coming from the clouds. I keep my eye on the windshield and it is getting worse. I pull over and stop and it is coming from the upper radiator hose where it attaches to the gooseneck on the tri-power. OK, just tighten it up and I’ll be back in business. Now for the first time in two years it looks like I might be able to drive it.
The First Driving ExperienceMy granddaughter had wanted me to take her to school in it so the boys could see that her grandpa really did have a GTO. I did that and it was fine, but my tires were leaking air so bad that I could not take it any great distance. They are Centerlines that are about 20 years old and the sealant had started leaking between the two halves of the rims. I was uncomfortable buying new rims because of the price and the potential that they might change the backspace a little bit. I only have Ľ" clearance on both the inside and the outside of the rear tires. By now it was time for our monthly local POCI meeting. I had the good fortune of meeting a gentleman that manages a tire store and he said he could get the wheels remanufactured. Great, I take him up on it. The only down side was that it took two more weeks to finish that process. While the car is jacked up with no wheels, I notice a gas leak somewhere in the front of the gas tank. I am hoping it is just the rubber lines in and out of the filter and fuel pump - just something else to check and fix. I change the rubber hoses from the tank to the pump and from the pump to the filter. I jumper my battery charger to the pump and it is OK. I check the fuses and the one for the pump is blown. I fix that and now I am awaiting the tires and wheels.
The First Road ExperienceI pick up the tires and wheels and now I am ready to drive the car to work. Note that I still have the hood off so I can observe any other "anomalies" that might come up. I go the back way and get about 6 miles from home when I start noticing mist on the windshield again. Soon it turns into a stream that looks like gas. It is shooting up from what appeared to be the center of the engine towards the left fender. I shut it off to assure it was not gasoline. No, it was the soft plug in the passenger side head that had gone in a little too easily. It looked like there was a ridge in the head at the side of the plug. During the process a kind person from New York sent me some slightly oversized soft plugs in the event that I needed them. They are 1 7/32" instead of the 1 3/8". Back to the slide hammer. I pull out the distributor again and pull the 1 3/8" plug out and install the larger one. I drive it around the block again and it now has two squirting streams that are worse than the first one. After that, I went to D-Mac’s shop to speak with him about the problem and he suggested using a rubber expansion plug. He just happened to have one that was 1 Ľ", but the end had been made a little conical so that it would just fit. I pulled the distributor AGAIN, pulled out the 1 7/32" plug, and then I used a Dremel to clean up the hole in the head a little and decided I would go ahead and try the expansion plug - even though it looked ugly. Plus if it had to come out I would probably not have to take out the distributor again. I finish installing the expansion plug, put the distributor cap back on and go to plug the coil wire back into the distributor cap when I notice the terminal is still in the cap. The coil wire had come apart. I go to the spare parts bin and make another coil wire, install it and start up the engine. Hooray, no more leak! For a test drive, I cruise by Mac’s shop again. This is a Sunday evening, but he was still there working on a customer’s car. We chat for a few minutes, and then I start it up to go back home. The battery barely turns it over. So, I charge the battery when I get home. Now I want to drive it to work, but it rains for two days. Besides getting the car messy, I still don’t have a hood on it, which allows me to see these continued leaking problems I have been having. Wednesday rolls around and it is finally not raining. As a matter of fact, it is one of the nicest days you will see in California. It is right after a rain, the high is about 53, and the visibility is about 50 miles or more with a cloudless sky. The only down side is that the car does not have a choke, or any exhaust heat in the manifold. That’s OK, just keep giving it gas. It was an interesting drive to work. I have to get used to people staring at the car again. It was especially funny watching the guys crane their necks to see what was in the engine compartment of the hoodless car.
Well, I made it to work OK. No water leaks, no dripping oil under that car, and it even started up at lunch when I went out to show it to someone. Hopefully the saga is complete. I still have to put on the hood, fix a header gasket leak and reinstall the stud girdle. By the way, one of the wheels still leaks air, but not nearly as bad as before. I will just carry an air bottle for a while. Also, I heard a lot of valve train noise while doing about 3500 RPM on the freeway when driving home from work. I don’t yet know if it was just louder because the hood was off, if some rockers loosened up, or if maybe I damaged something when the rockers hit the stud girdles. Sometimes it just doesn’t seem like it ever ends.
If there is a moral to this story it is to not break up the work on the engine into small time increments, and to double check and double think everything you do each step of the way. It is all too easy to do something that seems so routine and either forget to do something, or do something automatically and not recall if you actually did it or not.